mkdocs
安装
环境配置
Note
环境为CentOS7
mkdocs安装需要python3的环境,CentOS7默认为python2,这里使用miniconda3配置python3的环境。
$ mkdir -p ~/miniconda3
$ wget https://repo.anaconda.com/miniconda/Miniconda3-latest-Linux-x86_64.sh -O ~/miniconda3/miniconda.sh
$ bash ~/miniconda3/miniconda.sh -b -u -p ~/miniconda3
$ rm -rf ~/miniconda3/miniconda.sh

# 初始化
$ ~/miniconda3/bin/conda init bash
$ source ~/.bashrc
安装
安装mkdocs及mkdocs-material主题
$ pip install mkdocs mkdocs-material
项目创建
创建mkdocs项目,mkdocs站点的所有文档、生成的静态文件均在此目录内。
生成的mkdocs.yml为项目配置文件,docs目录存放需要编写的markdown文档。
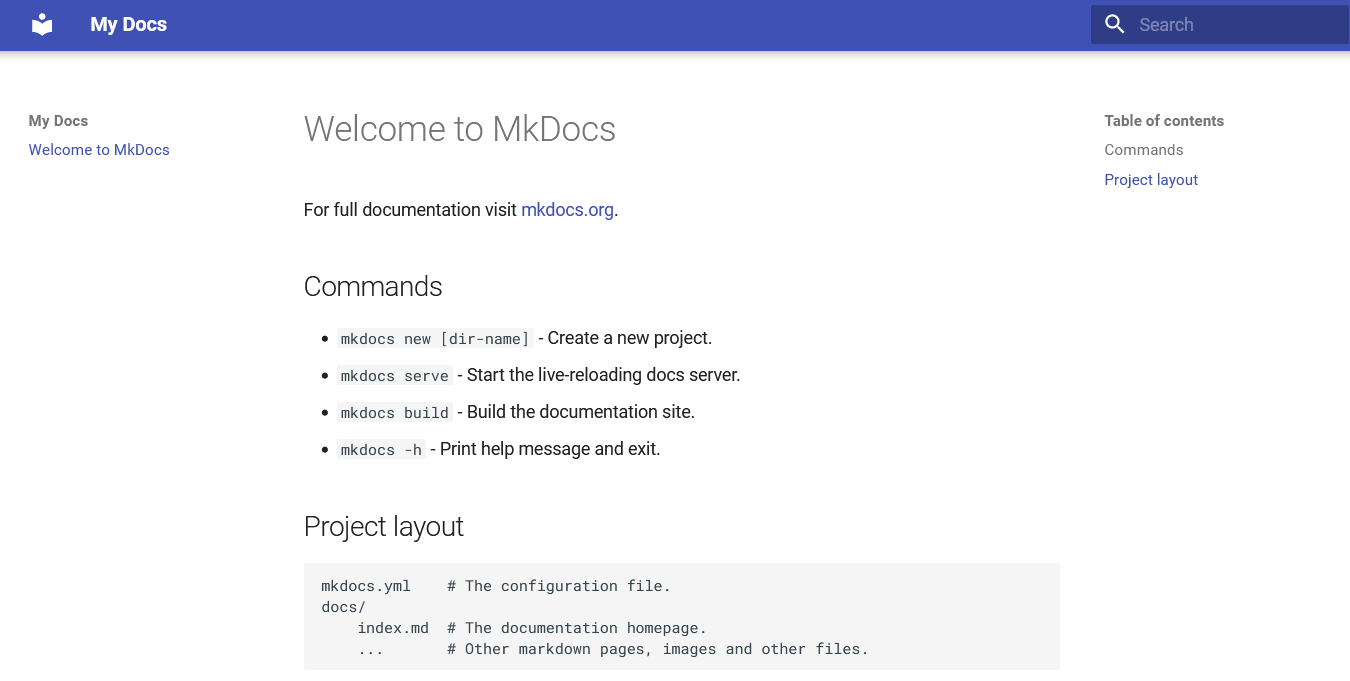
$ mkdocs new mydocs
INFO    -  Creating project directory: mydocs
INFO    -  Writing config file: mydocs/mkdocs.yml
INFO    -  Writing initial docs: mydocs/docs/index.md
$ cd mydocs
$ mkdocs serve -a 0.0.0.0:8000
INFO    -  Building documentation...
INFO    -  Cleaning site directory
INFO    -  Documentation built in 0.05 seconds
INFO    -  [18:12:36] Watching paths for changes: 'docs', 'mkdocs.yml'
INFO    -  [18:12:36] Serving on http://0.0.0.0:8000/
http://ip:8000
更换主题
编辑 mkdocs.yml 文件以更换主题。
初始配置文件内容。
site_name: My Docs
material 主题。 site_name: My Docs
theme:
name: 'material'
配置静态站点
将md文件生成HTML文件进行部署,使用静态文件安全性和速度更有保障。
生成的静态文件在 ~/mydocs/site 内,然后使用apache或Nginx进行配置部署。
$ cd mydocs
$ mkdocs build
INFO - Cleaning site directory
INFO - Building documentation to directory: ~/mydocs/site
INFO - Documentation built in 0.07 seconds
<VirtualHost *:80>
ServerName docs.domain.cn
DocumentRoot "/home/docks/mydocs/site"
ErrorLog /home/git/log
<Directory "/home/docks/mydocs/site">
Options Indexes FollowSymLinks
AllowOverride all
Require all granted
</Directory>
</VirtualHost>
内容编写
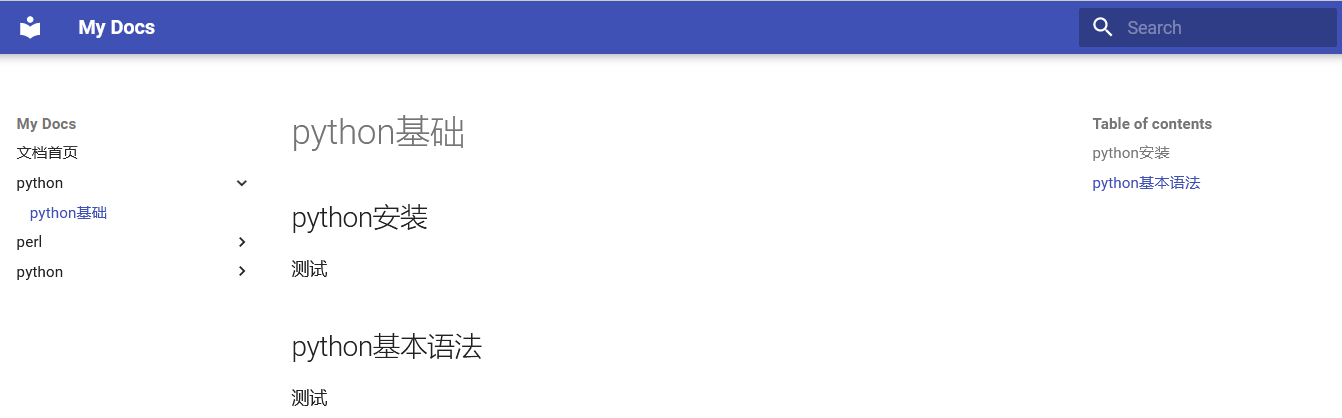
一般通过目录对文档内容进行分类,如catalog01、catalog02、catalog03。
$ cd mydocs
$ mkdir docs/{catalog01,catalog02,catalog03}
# 编写对应的markdown文档
$ vim docs/catalog01/pyhton.md
## python安装
测试
## python基本语法
测试
$ vim docs/catalog02/perl.md
## perl安装
测试
## perl基本语法
测试
$ vim docs/catalog02/R.md
## R安装
测试
## R基本语法
测试
然后在mkdocs.yml配置文件内添加上面编写的markdown文档。
site_name: My Docs
theme:
  name: 'material'
nav:
- 文档首页: 'index.md'
- 'python':
- python基础 : 'catalog01/pyhton.md'
- 'perl':
- perl基础 : 'catalog02/perl.md'
- 'python':
- R基础 : 'catalog03/R.md'
$ mkdocs build
Note
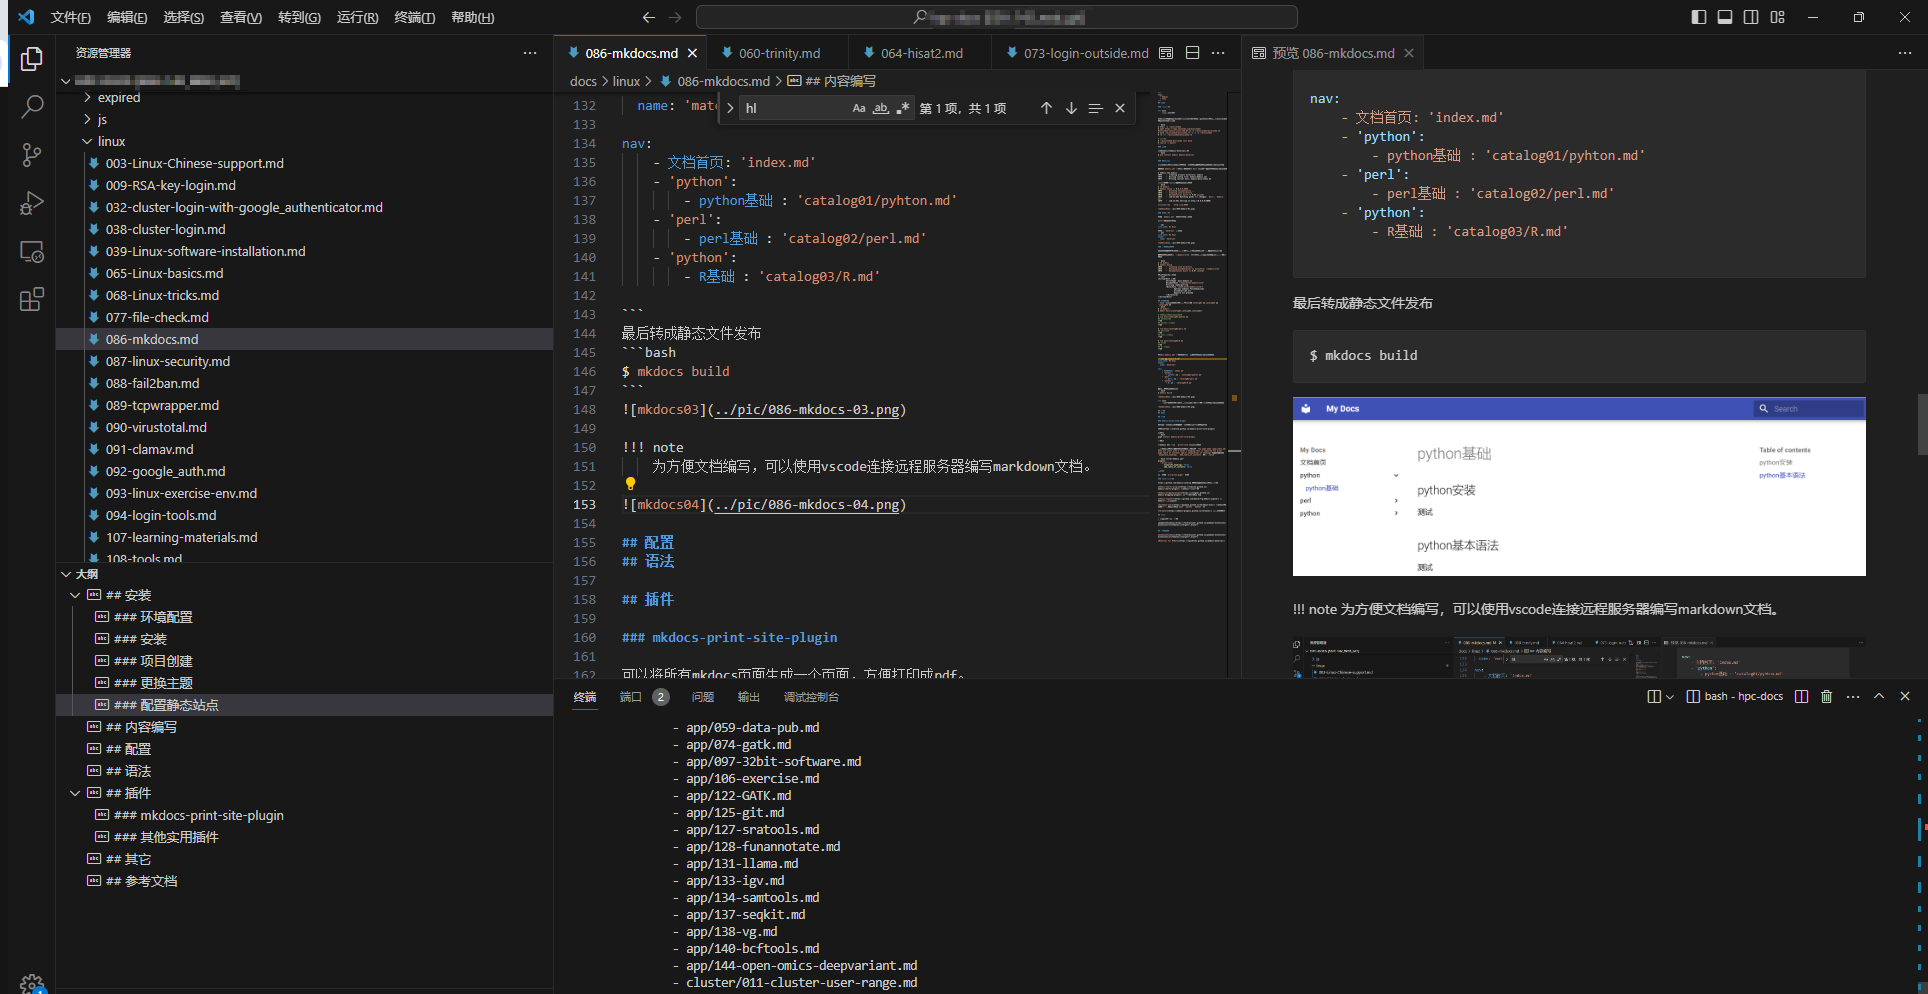
为方便文档编写,可以使用vscode连接远程服务器编写markdown文档。
配置
语法
代码块
```bash linenums="1" hl_lines="3 4 14 18"
#!/bin/python

print("hellow, world!")
print("this is a test!")
```
渲染效果
#!/bin/python

print("hellow, world!")
print("this is a test!")
提醒块
!!! warning
    提示
Warning
提示
模板覆盖
可以通过改写模版文件自定义页面上的部分内容,如页脚、导航栏等,模版文件位于 lib/python3.9/site-packages/material/templates/partials/ 下,
$ ls ~/miniconda3/lib/python3.9/site-packages/material/templates/partials/
actions.html    content.html    header.html   language.html  nav-item.html    progress.html     source.html     toc.html
alternate.html  copyright.html  icons.html    languages      pagination.html  search.html       tabs.html       toc-item.html
comments.html   feedback.html   integrations  logo.html      palette.html     social.html       tabs-item.html  top.html
consent.html    footer.html     javascripts   nav.html       post.html        source-file.html  tags.html
这里以在网页下方添加备案号为例,说明其用法。
在 mkdocs.yml 同级目录下创建 overrides/partials/copyright.html,内容如下
<div class="md-copyright">
  {% if config.copyright %}
    <div class="md-copyright__highlight">
      {{ config.copyright }}
    </div>
  {% endif %}
  {% if config.extra.beian %}
    <div class="md-copyright__beian">
      <a href="http://beian.miit.gov.cn/" target="_blank" rel="noopener">
        {{ config.extra.beian }}
      </a>
    </div>
  {% endif %}
  {% if not config.extra.generator == false %}
    Made with
    <a
      href="https://squidfunk.github.io/mkdocs-material/"
      target="_blank" rel="noopener"
    >
      Material for MkDocs
    </a>
  {% endif %}
</div>
extra:
  beian: '鄂ICP备XXXXXXXX号'
mkdocs.yml 中配置模板覆盖 theme:
name: material
custom_dir: overrides
升级
Warning
由于跨大版本升级,有许多地方需要更改,因此升级之前需要先认真阅读 官方升级文档。
8.x to 9.x
由于mkdocs的搜索功能一直有点问题无法使用 (正在初始化搜索引擎, Initializing search engine),比较影响用户体验。查了诸多资料之后发现可能某种原因触发了软件bug导致的,官方开发人员在 github issue 上回复9.x版中修复了该bug,因此进行了此次升级。
罪魁祸首:chrome F12中的js报错
lunr.ja.min.js:1 Uncaught (in promise) TypeError: t.toLowerCase is not a function
at lunr.ja.min.js:1:862
at Array.map (<anonymous>)
at e.ja.tokenizer (lunr.ja.min.js:1:823)
at t.Builder.add (lunr.js:2479:23)
at t.Builder.<anonymous> (index.ts:217:14)
at t (lunr.js:53:10)
at new U (index.ts:177:18)
at index.ts:146:15
at Generator.next (<anonymous>)
at s (search.16e2a7d4.min.js:1:953)
- 升级后搜索功能恢复正常
- 代码高亮出现了bug,单行代码超过代码框的部分未被高亮
mkdocs build编译时间从18s增加到了25s
# 查看版本升级前的版本
$ pip show mkdocs-material
Name: mkdocs-material
Version: 8.5.10
Summary: Documentation that simply works
Home-page: None
Author: None
Author-email: Martin Donath <martin.donath@squidfunk.com>
License: None
Location: /home/mkdocs/software/miniconda3/lib/python3.9/site-packages
Requires: requests, pymdown-extensions, jinja2, mkdocs-material-extensions, pygments, markdown, mkdocs
Required-by: mkdocs-print-site-plugin
# 升级
$ pip install --upgrade --force-reinstall mkdocs-material
# 查看升级后的版本
$ pip show mkdocs-material
Name: mkdocs-material
Version: 9.5.13
Summary: Documentation that simply works
Home-page: None
Author: None
Author-email: Martin Donath <martin.donath@squidfunk.com>
License: None
Location: /home/mkdocs/software/miniconda3/lib/python3.9/site-packages
Requires: mkdocs-material-extensions, requests, markdown, paginate, babel, jinja2, pymdown-extensions, mkdocs, regex, colorama, pygments
Required-by: mkdocs-print-site-plugin
# 配置文件备份,以防后面修改配置文件过程中出错
$ cp mkdocs.yml mkdocs_240314.yml
mkdocs serve,查看是否能正常运行,并根据该命令运行的日志内容对配置文件mkdocs.yml内容进行修改。 配置文件中的部分改动
material.emoji.twemoji 改为 material.extensions.emoji.twemoji
prebuild_index 特性不再支持需要删除
{#-
This file was automatically generated - do not edit
-#}
{% if "tags" in config.plugins %}
{% include "partials/tags.html" %}
{% endif %}
{% include "partials/actions.html" %}
{% if not "\x3ch1" in page.content %}
<h1>{{ page.title | d(config.site_name, true)}}</h1>
{% endif %}
{{ page.content }}
<font size="2" color="grey">本文阅读量 <span id="busuanzi_value_page_pv"></span> 次</font>
<br>
<font size="2" color="grey">本站总访问量 <span id="busuanzi_value_site_pv"></span> 次</font>
{% include "partials/source-file.html" %}
{% include "partials/feedback.html" %}
{% include "partials/comments.html" %}
site_name: 作重计算平台用户手册
copyright: 'Copyright © 2023 <a href="http://croplab.hzau.edu.cn" target="_blank">华中农业大学作物遗传改良全国重点实验室</a>'
theme:
  name: material
  custom_dir: overrides
language: 'zh' # 配置语言
features:
- content.code.annotate # 代码注释
- navigation.top # 长页面点击快速回到页面顶部
palette: # 白天黑夜切换
- media: "(prefers-color-scheme: light)"
scheme: default
toggle:
icon: material//weather-sunny
name: Switch to dark mode
- media: "(prefers-color-scheme: dark)"
primary: teal
scheme: slate
toggle:
icon: material/weather-night
name: Switch to light mode
extra_javascript:
- http://busuanzi.ibruce.info/busuanzi/2.3/busuanzi.pure.mini.js # 访问统计
- 'js/baidu-tongji.js' # 百度统计
- 'js/tablesort.js' # 表格排序
markdown_extensions:
- pymdownx.snippets: # 往文档中嵌入其它文档的内容
check_paths: true
- pymdownx.arithmatex
- pymdownx.superfences
- pymdownx.details # 提示块可折叠
- pymdownx.magiclink
- pymdownx.tilde # 删除线下标
- pymdownx.caret # 下划线上标
- pymdownx.emoji
- pymdownx.mark # 文本高亮
- pymdownx.smartsymbols # 符号转换
- pymdownx.critic # 增加删除修改高亮注释,可修饰行内或段落
- pymdownx.tabbed: # tab块
alternate_style: true
- pymdownx.snippets:
base_path: ./codes/
- pymdownx.inlinehilite # 行内代码高亮
- pymdownx.magiclink # 自动识别超链接
- pymdownx.superfences # 代码嵌套在列表里
- pymdownx.highlight: # 代码高亮,显示行号
linenums: true
linenums_style: pymdownx-inline
- pymdownx.emoji: # 表情
emoji_index: !!python/name:materialx.emoji.twemoji
emoji_generator: !!python/name:materialx.emoji.to_svg
- toc: # 锚点
permalink: true
slugify: !!python/object/apply:pymdownx.slugs.slugify {kwds: {case: lower}} # 自定义页面锚点,如 ## Custom Heading {#custom-anchor}
- admonition # 提示块
- footnotes # 脚注
- meta # 定义元数据,通过文章上下文控制,如disqus
- pymdownx.betterem: # 对加粗和斜体更好的检测
smart_enable: all
- pymdownx.tasklist: # 复选框checklist
custom_checkbox: true
- attr_list #增加css-html样式,例如按钮,比如图片定义大小,caption,设置新窗口中打开链接
- md_in_html
- pymdownx.arithmatex # 数学公式
plugins:
- glightbox: # 图片点击放大 https://github.com/blueswen/mkdocs-glightbox
- search: # 下面的设置以便中文搜索
separator: '[\s\u200b\-]'
lang: ja
- git-revision-date-localized: # 配合git,以显示每个页面的创建和修改时间
type: date
enable_creation_date: true
fallback_to_build_date: true
- tags:
tags_file: tags.md
- exclude: # 编译静态页面时排除的文件和目录
glob:
- "tmp/*"
- "*.tmp"
- "*.pdf"
- "*.gz"
regex:
- '.*\.(tmp|bin|tar)$'
- print-site: # 将所有页面都在一个页面内生成
# 防止生产静态页面时报错,需添加以下两个选项
enumerate_headings: false
add_table_of_contents: false
nav:
- 介绍: index.md
- 集群相关:
- 常见问题(FAQ) : cluster/062-FAQ.md
- 集群硬件资源: cluster/015-cluster-hardware.md
- 用户资源限制: cluster/012-user-resource-limit.md
- 集群登录: cluster/073-login-outside.md
- LSF基本使用: cluster/016-LSF.md
- 集群账号申请: cluster/033-cluster-account-application.md
- 账号密码修改: cluster/008-change-password.md
- 作业队列划分: cluster/031-cluster-lsf-queue.md
- 备份存储使用: cluster/022-backup-storage.md
- 账户注销: cluster/037-cluster-account-deletion.md
- 集群考试内容: cluster/036-examination-syllabus.md
- 集群收费标准: cluster/027-cluster-fee.md
- 论文致谢: cluster/057-acknowlege.md
- 数据使用规范: cluster/058-data-manage.md
- 数据共享: cluster/061-data-share.md
- GPU节点使用: cluster/068-GPU-node.md
- 文件扫描: cluster/070-file-scan.md
- 文件完整性检查: linux/077-file-check.md
- 使用本地存储: cluster/114-local-storage.md
- 数据下载: cluster/080-download-data.md
- 应用软件:
- 介绍: app/index.md
- 软件安装: app/066-software-installation.md
- 生信数据库: app/025-bioinformatics-database.md
- 短序列比对输出bam: app/054-sam-to-bam.md
- fq比对建议: app/071-fq2bam.md
- 多语言gzip文件读写: app/056-api_read_write_gzip.md
- 常用生信数据处理操作: app/096-biodata-manipulate.md
- 运行32位软件: app/101-run-32bit-software.md
- gcc: app/034-gcc.md
- glibc: app/095-glibc.md
- module: app/004-Module.md
- singularity: app/007-singularity.md
- perl: app/005-perl.md
- R: app/006-R.md
- RStudio: app/105-rstudio.md
- MySQL: app/014-mysql-database.md
- python: app/029-python.md
- mamba: app/099-mamba.md
- nextflow: app/035-nextflow.md
- linux:
- linux 基础: linux/065-Linux-basics.md
- linux 练习: linux/116-linux-exercise.md
- linux 学习环境: linux/093-linux-exercise-env.md
- linux 远程登录工具: linux/094-login-tools.md
- linux tricks: linux/068-Linux-tricks.md
- linux 中文支持: linux/003-Linux-Chinese-support.md
- linux 无root编译安装软件: linux/039-Linux-software-installation.md
- 使用SSH密钥登录服务器: linux/009-RSA-key-login.md
- 在 Fish 环境中使用 module: linux/132-fish-shell-module.md
- OnePage: print_page/
访问统计
mkdocs 作为一个纯静态网站,自身无法对访问量进行统计,需要借助第三方工具,这里使用不蒜子来实现,这是一款轻量级的网站访问统计工具,几行代码即可调用,可以使用公共的不蒜子服务,也可以自行搭建不蒜子服务。
公共不蒜子
https://ibruce.info/2015/04/04/busuanzi/
通过模版覆盖来实现,在 docs/overrides/partials/content.html 写入以下内容。
{#-
This file was automatically generated - do not edit
-#}
{% if "material/tags" in config.plugins and tags %}
{% include "partials/tags.html" %}
{% endif %}
{% include "partials/actions.html" %}
{% if "\x3ch1" not in page.content %}
<h1>{{ page.title | d(config.site_name, true)}}</h1>
{% endif %}
{{ page.content }}
<script async src="//busuanzi.ibruce.info/busuanzi/2.3/busuanzi.pure.mini.js">
<font size="2" color="grey">本文阅读量 <span id="busuanzi_value_page_pv"></span> 次</font>
<br>
<font size="2" color="grey">本站总访问量 <span id="busuanzi_value_site_pv"></span> 次</font>
{% include "partials/source-file.html" %}
{% include "partials/feedback.html" %}
{% include "partials/comments.html" %}
其它公共不蒜子服务
自建不蒜子统计服务
项目地址 https://github.com/soxft/busuanzi
相关文档 https://busuanzi.apifox.cn/doc-5083722
配置 redis
不蒜子数据存储使用的 redis
yum install redis
systemctl start redis
systemctl enable redis
安装配置不蒜子服务
Warning
busuanzi 官方预编译版本依赖高版本 glibc,无法在 centos7 上运行,可以使用纯静态编译的版本 busuanzi_linux_x86_2.8.8。
$ git clone https://github.com/soxft/busuanzi && cd busuanzi

# 下载预编译版本
$ wget https://github.com/soxft/busuanzi/releases/download/v2.8.7/busuanzi-linux-amd64-v2.8.7 -o busuanzi
# 或自己编译
$ go build -o busuanzi main.go
config.yaml,将 Address: 0.0.0.0:8080 更改为 Address: 127.0.0.1:8204;将 Cors: "https://xsot.cn,https://google.com" 更改为 Cors: "*",以实现跨域访问,否则网站无法正常调用不蒜子服务, F12 调试时会出现报错 has been blocked by CORS policy,当然也可以将允许调用本服务的网站域名写在这里,非列表中的网站则无法正常调用本服务,实现类似白名单的效果。 启动不蒜子服务
$ ./busuanzi
2025/10/17 16:15:36 [INFO] Redis trying connect to tcp://127.0.0.1:6379/0
2025/10/17 16:15:36 [INFO] Redis init success, pong: PONG
2025/10/17 16:15:36 [INFO] server running on 127.0.0.1:8204
docs.domain.cn)的路径。 ProxyPass /busuanzi http://127.0.0.1:8204
ProxyPassReverse /busuanzi http://127.0.0.1:8204
curl docs.domain.cn/busuanzi。 将 dist/busuanzi.js 中的 http://127.0.0.1:8080/api 更改为上面的反向代理地址 http://docs.domain.cn/busuanzi/api。
在 disk/index.html 中的 本页访问量 和 本页访客数 上方添加代码 <script async src="http://docs.domain.cn/busuanzi/js"></script>
网页中打开 http://docs.domain.cn/busuanzi,看网页上显示的访问数据是否正常,如下所示。如果数据为空,则需要检查哪里出了问题。
本页访问量 6 次 本页访客数 1 人

本站访问量 6 次 本站访客数 1 人
busuanzi.service,内容如下,相关文件和配置文件路径根据需求修改。 [Unit]
Description=busuanzi
After=network.target redis.service
Requires=redis.service
[Service]
User=username
Group=username
ExecStart= /path/to/busuanzi -c /path/to/config.yaml -d /path/to/dist
[Install]
WantedBy=multi-user.target
busuanzi.service 拷贝至 /usr/lib/systemd/system/,然后启动服务。 $ cp busuanzi.service /usr/lib/systemd/system/
# 启动服务
$ systemctl start busuanzi.service
# 查看服务是否正常启动
$ systemctl status busuanzi.service
$ lsof -i:8204
# 开机启动
$ systemctl enable busuanzi.service
配置 mkdocs
在 docs/overrides/partials/content.html 写入以下内容。
{#-
This file was automatically generated - do not edit
-#}
{% if "material/tags" in config.plugins and tags %}
{% include "partials/tags.html" %}
{% endif %}
{% include "partials/actions.html" %}
{% if "\x3ch1" not in page.content %}
<h1>{{ page.title | d(config.site_name, true)}}</h1>
{% endif %}
{{ page.content }}
<script async src="http://docs.domain.cn/busuanzi/js"></script>
<font size="2" color="grey">本文阅读量 <span id="busuanzi_page_pv"></span> 次</font>
<br>
<font size="2" color="grey">本站总访问量 <span id="busuanzi_site_pv"></span> 次</font>
{% include "partials/source-file.html" %}
{% include "partials/feedback.html" %}
{% include "partials/comments.html" %}
数据迁移
如果之前使用的原版不蒜子(https://busuanzi.ibruce.info/),可使用 busuanzi-sync 将之前的网站访问统计数据迁移至自建的不蒜子服务。
Warning
busuanzi-sync 的官方预编译版本依赖高版本 glibc,无法在 centos7 上运行,可以使用纯静态编译的版本 busuanzi-sync_linux_x86_0.0.5。
# 下载编译好的 busuanzi-sync,或自行编译
$ wget https://github.com/soxft/busuanzi-sync/releases/download/v0.0.5/busuanzi-sync-linux-amd64-v0.0.5
$ chmod +x busuanzi-sync-linux-amd64-v0.0.5
busuanzi-sync-linux-amd64-v0.0.5 同级目录中新建文件 .env,内容如下 # 在此处指定您的博客 sitemap 地址
SITEMAP_URL: http://docs.domain.cn/sitemap.xml
# 线程数 避免过高导致 QPS 限制 / 不要超过5
THREADS: 2
# 单 URL 最大重试次数
MAX_RETRY: 10
# 注意 redis 的访问地址、密码、前缀等,需与上面 busuanzi 配置文件 config.yaml 保持一致
REDIS_ADDR: 127.0.0.1:6379
REDIS_DB: 0
REDIS_PWD: ""
REDIS_PREFIX: bsz
REDIS_TLS: false
# 路径样式 与加密方案
BSZ_PATH_STYLE: true
BSZ_ENCRYPT: MD516
$ ./busuanzi-sync-linux-amd64-v0.0.5
2025/10/20 10:35:12 执行此脚本请务必提前手动备份 Redis (dump.rdb)
2025/10/20 10:35:12 继续操作将可能造成不可逆的数据丢失
2025/10/20 10:35:12 我确认已经备份数据库了 (y/N):
y
2025/10/20 10:35:13 --- 开始执行脚本 ---
2025/10/20 10:35:16 [INFO] Config loaded map[bsz_encrypt:MD516 bsz_path_style:true max_retry:10 redis_addr:127.0.0.1:6379 redis_db:0 redis_prefix:bsz redis_pwd:re.dis@2510 redis_tls:false sitemap_url:http://docs.domain.cn/sitemap.xml threads:1]
2025/10/20 10:35:16 [INFO] Redis trying connect to tcp://127.0.0.1:6379/0
2025/10/20 10:35:16 [INFO] Redis init success, pong: PONG
2025/10/20 10:35:16 [INFO] 开始读取 sitemap.xml
2025/10/20 10:35:16 --- URL: 195 , 线程数: 1 ---
2025/10/20 10:35:16 [INFO] 尝试同步 SitePV 与 SiteUV
2025/10/20 10:35:16 [INFO] 尝试同步 PagePV 与 PageUV
Processing... 100% |████████████████████████████████████████| (195/195)[53s:0s]
2025/10/20 10:36:10 --- 所有任务已完成 ---
插件
mkdocs-print-site-plugin
可以将所有mkdocs页面生成一个页面,方便打印成pdf。
文档:https://timvink.github.io/mkdocs-print-site-plugin/
安装:
pip3 install mkdocs-print-site-plugin
在mkdocs.yml 中添加print-site及相关选项。
使用默认选项时,生产静态页面会出现报错 The page 介绍 (app/index.md) does not start with a level 1 heading.This is required for print page Table of Contents and/or enumeration of headings。因此需要将 enumerate_headings add_table_of_contents 置为 false
plugins:
  - print-site:
      enumerate_headings: false
      add_table_of_contents: false
打开页面 url/print_page/ 即可
mkdocs-asciinema-player
https://github.com/pa-decarvalho/mkdocs-asciinema-player/
https://pa-decarvalho.github.io/mkdocs-asciinema-player/
安装
$ pip install mkdocs-asciinema-player
plugins:
  - asciinema-player:
录制开始后与使用正常终端无区别,按
$ asciinema rec -t "samtools" samtools.cast
::: Recording session started, writing to test_cast
::: Press <ctrl+d> or type 'exit' to end
写入md文档
```asciinema-player ```
{
    "file": "../../asciinema/samtools.cast",
    "mkap_theme": "penguin"
}
效果
mkdocs-encryptcontent-plugin
mkdocs-encryptcontent-plugin 是一个 MkDocs 插件,用于对 Markdown 内容进行 AES-256 加密/解密。它使用 Python 的 PyCryptodome 库在服务器端加密,并在浏览器中使用 Crypto-JS 或 WebCrypto API 解密,支持全局密码、页面级密码和多级保护。该插件适用于保护文档中的敏感内容,如私有知识库或技术文档。
https://github.com/unverbuggt/mkdocs-encryptcontent-plugin/
https://unverbuggt.github.io/mkdocs-encryptcontent-plugin/
- 安装
$ pip install mkdocs-encryptcontent-plugin - 配置
mkdocs.ymlplugins: - search # 如果使用搜索,必须显式启用 - encryptcontent: # 插件配置 global_password: 'your_global_password' # 全局密码(可选,默认无,所有页面除首页外加密) password_inventory: # 密码库存(可选,多级保护) classified: 'password1' # 简单密码 confidential: # 多个密码 - 'password2' - 'password3' secret: # 用户/密码对 user4: 'password4' user5: 'password5' password_file: 'passwords.yml' # 外部 YAML 文件(可选,用于分离敏感信息) search_index: 'encrypted' # 搜索索引模式:'clear'(不加密)、'dynamically'(动态)、'encrypted'(默认,全加密) title_prefix: '[LOCK]' # 加密页面标题前缀(默认 '[Protected]') summary: 'This content is protected with AES encryption.' # 加密摘要消息(自定义) remember_password: true # 启用密码记忆(浏览器本地存储,默认 false) default_expire_delay: 24 # 密码记忆过期时间(小时,默认 24) webcrypto: true # 使用浏览器 WebCrypto API 解密(默认 Crypto-JS,更快但需浏览器支持)
相关说明:
global_password:应用于所有页面(除首页),优先级低于页面级密码password_inventory:定义保护级别,可在 Markdown 中引用password_file:外部文件示例(passwords.yml)secret: user1: !ENV [ENV_PASSWORD, 'fallback_password']支持环境变量!ENV,避免硬编码search_index:控制搜索结果是否加密在 Markdown 文件中使用加密
在需要保护的 Markdown 文件(.md)开头添加 YAML 元数据(frontmatter):
- 简单页面密码:
---
password: 'secret_password'  # 页面专用密码(优先于全局)
---
# 加密内容

这段文本将被 AES-256 加密。只有输入正确密码才能在浏览器解密查看。
多级保护:
---
level: secret  # 引用 password_inventory 中的 'secret' 级别
---
# 敏感文档
内容...
加密导航栏
plugins:
  - encryptcontent:
      encrypted_something:
        md-nav: [nav, class]  # 加密导航栏
禁用加密:设置
password: ''(空字符串)全局应用:无需元数据,使用
global_password自动加密所有页面特殊级别:使用
_global覆盖所有页面,如password_inventory: _global: ['pass1', 'pass2']
其他实用插件
https://github.com/mkdocs/catalog 探索优秀的mkdocs项目和插件
mkdocs-charts-plugin 在mkdocs中创建图表
mkdocs-blogging-plugin 博客插件,支持 Tag
mkdocs-jupyter 在mkdocs中使用jupyter
markdown-exec 在mkdown代码块中执行代码,支持bash python mkdown 等
Termynal 动画终端窗口
mkdocs-alias-plugin build时自定义标题
mkdocs-live-edit-plugin 在线写mkdocs文档
mkdocs-add-number-plugin md页面的标题添加数字序号,只影响html渲染页面,不影响md文档
mkdocs-encryptcontent-plugin 给文档内容加密码
mkdocs-macros-plugin 可用于在 MkDocs 中添加宏和变量功能,从而创建更丰富的文档页面
其它
中文技术文档的写作规范
https://github.com/ruanyf/document-style-guide
在新网页中打开链接
[pymdown拓展语法](https://facelessuser.github.io/pymdown-extensions/extensions/arithmatex/){target="_blank"}
搜索功能
mkdocs 官方准备重头开发文档搜索模块以代替 Lunr.js,进展见 Towards better documentation search #6307。
搜索功能有时候会抽风,如果发现搜索功能异常,在浏览器中查看 http://url/search/search_index.json 的内容是否正常。
mkdocs build --dirty 时只会索引更改过的页面,导致搜索功能异常,因此少量修改时可以使用原来的索引,操作如下:
cp site/search/search_index.json . && mkdocs build --dirty && cp search_index.json site/search/
mkdocs build --clean 生成完整的索引。 中文搜索支持:
https://cloud.tencent.com/developer/article/2303134
https://zhuanlan.zhihu.com/p/411854801
Note
在 9.x 版中已经支持了中文搜索。
自定义锚点
在写文档过程中经常有中文标题或中英文混杂的各级标题,URL引用或页面交叉引用时风格不一,如中文标题的锚点会变为 #_1,而英文或中英文混杂的直接为英文。在标题后面添加 {#custom-anchor} 即可自定义锚点。
如标题 ## 载入python {#load-python},网页链接引用时的URL为 http://hpc.ncpgr.cn/app/029-python/#load-python,其它站内文档交叉引用的链接为 [python使用](../app/029-python/#load-python)。
中文锚点自动转拼音
使用 pymdownx.slugs.slugify 功能可以保留中文锚点不被转成类似 #_1 的形式,但 pymdownx.slugs.slugify 对中文做处理的时候会对中文进行 utf-8 编码,导致URL复制后出现类似乱码的情况,如 中文标题 会复制粘贴后显示为 %E4%B8%AD%E6%96%87%E6%A0%87%E9%A2%98。
python有个包 python-slugify 用于将字符串转成URL友好的格式,如可以将 中文标题 转成 zhong-wen-biao-ti 这样的汉语对应的拼音ASCII字符串。
from slugify import slugify
title = "中文标题"
slug = slugify(title)
print(slug)  # 输出: "zhong-wen-biao-ti"
pymdownx.slugs.slugify 模块进行改写,首先安装这个包 pip install python-slugify,改写 slugs.py 文件(添加下面高亮的2行代码)。 import re
import unicodedata
import functools
from urllib.parse import quote
from . import util
from slugify import slugify as slugifyx # 引入slugify中的slugify函数,并重命名为slugifyx,以免与代码中原有的slugify冲突
RE_TAGS = re.compile(r'</?[^>]*>', re.UNICODE)
RE_INVALID_SLUG_CHAR = re.compile(r'[^\w\- ]', re.UNICODE)
RE_SEP = re.compile(r' ', re.UNICODE)
RE_ASCII_LETTERS = re.compile(r'[A-Z]', re.UNICODE)
def _uslugify(text, sep, case="none", percent_encode=False, normalize='NFC'):
"""Unicode slugify (`utf-8`)."""
# Normalize, Strip html tags, strip leading and trailing whitespace, and lower
slug = RE_TAGS.sub('', unicodedata.normalize(normalize, text)).strip()
if case == 'lower':
slug = slug.lower()
elif case == 'lower-ascii':
def lower(m):
"""Lowercase character."""
return m.group(0).lower()
slug = RE_ASCII_LETTERS.sub(lower, slug)
elif case == 'fold':
slug = slug.casefold()
# Remove non word characters, non spaces, and non dashes, and convert spaces to dashes.
slug = RE_SEP.sub(sep, RE_INVALID_SLUG_CHAR.sub('', slug))
# 使用slugifyx函数对字符串进行处理
slug = slugifyx(slug)
return quote(slug.encode('utf-8')) if percent_encode else slug
pymdownx.slugs.slugifymarkdown_extensions:
- toc:
permalink: true
slugify: !!python/object/apply:pymdownx.slugs.slugify {kwds: {case: lower}}
## 载入python,网页链接引用时的URL自动变为 http://hpc.ncpgr.cn/app/029-python/#zai-ru-python,其它站内文档交叉引用的链接为 [python使用](../app/0029-python/#zai-ru-python)。 这里有个小bug,中英文混排时英文与后面的中文之间如果没有空格,会将该英文单词与该汉字的拼音转成一个字符串,如 安装python模块 会转成 an-zhuang-pythonmo-kuai,安装python 模块则正常转换 an-zhuang-python-mo-kuai。
build 策略
mkdocs build 默认使用了 --clean 选项,即会在build之前删掉所有之前build时创建的静态文件,如果文档数量较多,整个过程速度会比较慢,如本站build的时间约为25秒,build期间网站不可使用。如果修改比较频繁,则比较影响使用体验。
因此对大型文档网站,只对部分页面进行了修改,可以使用mkdocs build --dirty,只build修改了页面,速度会快很多,如本站使用mkdocs build --dirty后build的时间缩短为不到2秒。
mkdocs build --dirty 对文档搜索和OnePage插件使用有影响,应慎重使用。
For large sites the build time required to create the pages can become problematic, thus a "dirty" build mode was created. This mode simply compares the modified time of the generated HTML and source markdown. If the markdown has changed since the HTML then the page is re-constructed. Otherwise, the page remains as is. It is important to note that this method for building the pages is for development of content only, since the navigation and other links do not get updated on other pages.
为避免大型文档在 build 期间不可访问,可将 build 输出到临时目录,然后替换静态站点,具体操作如下。每次 build 时执行这个脚本即可。
# 每次修改之后将文档推送到gitee私人仓库备份
git add -A
git commit -m "$(date)"
git push -u origin master

# build 输出到临时目录,然后再替换正式目录
mkdir site-tmp
mkdocs build --clean -d site-tmp
mv site tmp
mv site-tmp site
rm -rf tmp/site
参考文档
https://shafish.cn/blog/mkdocs/
本文阅读量 次本站总访问量 次